During this time of lockdown, most of us are working from home and are required to be in constant communication with our colleagues or employers throughout the day via Skype or Zoom Video calls or other online videoconference calls.
Many people might have a laptop with a built-in webcam, but there are some who might not have a PC with a webcam installed or might have one but is not working properly or has some issue with it.
Also, if you have ever tried attending a meeting from your laptop, you probably would have realized what a joke the in-built webcam on your laptop is. In most cases, buying a dedicated webcam will significantly boost your video quality.
JOIN US ON TELEGRAM
But webcams are difficult to find and expensive right now. So, the good news is you don’t need to shell out money on a webcam, you already have a good one in the form of your Xiaomi or an Android smartphone.
We all know that good camera quality is a trend nowadays, our phones are already packed with some impressive camera hardware. Therefore, it makes sense to use them for video calls on computers too.
Our smartphones can make a pretty decent wireless webcam that’s guaranteed to be miles better than the VGA laptop webcam. So here, in this article, we’ll see how to use an Android phone as a webcam for your PC or laptop. If you also want to try this amazing hack, then do follow the steps given below.
Before you began:
- Make sure your phone and PC are connected to the same WiFi network while performing this hack.
How to use a smartphone camera as a webcam on your PC/Laptop:
- Download the DroidCam app on your Android phone.
- Next, you’ll need to download the desktop client of DroidCam on your laptop/desktop.
- Now open DroidCam on your phone and grant video and audio permissions.
- Install the DroidCam app on your PC. Agree to the license agreement, choose the installation location, and click install.
- Run the PC client. You’ll see a small pop-up box with three options to connect your phone. The Wi-Fi connection is selected by default, and that’s what we’re proceeding with here.
- Enter the IP address and port shown on your phone.
- Make sure both video and audio boxes are checked, if yes then hit the start button, and you are done.


After successfully connecting the phone and laptop/PC:
- By default, the app will use your rear camera, you can also use the front camera if you want. You can change the camera by clicking on the camera icon located beside the three-dot menu in the mobile app.
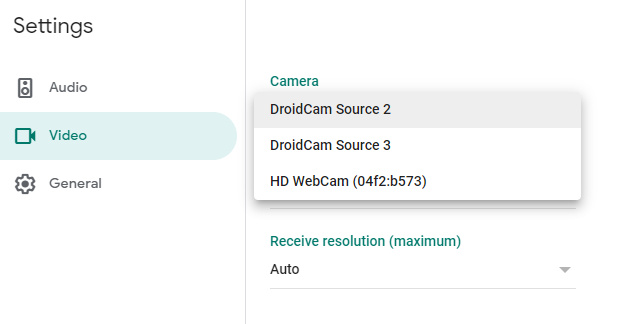
- Configure your video conferencing app to use the DroidCam feed. Launch the video conferencing app of your choice and start a meeting. By default, the app will be using the in-built webcam. To change that, open the settings and change the video to “DroidCam source 2” or “DroidCam source 3” (if Source 2 does not give you output).
- For audio, you can either use your phone’s microphone or rely on your computer’s microphone. To change the microphone input to your smartphone, go to audio settings in your conferencing app, and under the microphone option, choose “DroidCam Virtual Audio”.
- The only thing now left is to figure out the place for your smartphone. You can use a simple phone cradle or those fancy ones that let you adjust angle and height to your liking.